

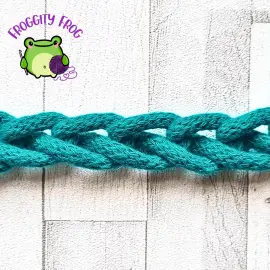
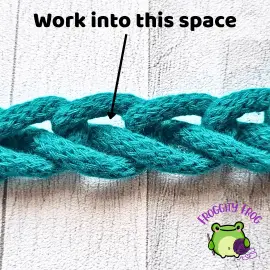
Foundation chains have 3 loops. 2 on the front and one on the back.
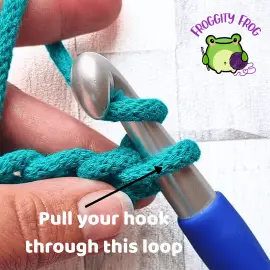
Chains are easy to make as you just catch the yarn in your hook (called Yarn Over as the yarn goes over the top of the hook – see the picture below) and then pull it through the loop of yarn on your hook. This is all there is to making chains – watch the video above to see how to crochet foundation chains in action.
The tricky part of making a foundation chain is making a slip knot to secure your yarn onto your hook in the first place.
You make a slipknot by wrapping the yarn around your hook and holding it tight until you make your first chain – see the video above to see how I do it. Some crocheters make an actual knot to make securing the yarn easier, but then this know is visible in the final project. It’s your choice which method you use.
Making Neat Foundation Chains
When you first start making chains, they may look a bit messy and uneven. That’s because you need to learn how to control the tension of your yarn. This just takes practice and you will naturally get better at making even chains with time.
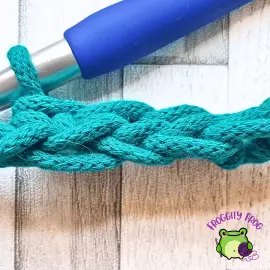
I control my tension with the way I hold my yarn and this method works well for me, but you may well find a way of holding your yarn that works better for you – there is no right way to hold your yarn, just the way that works best for you.
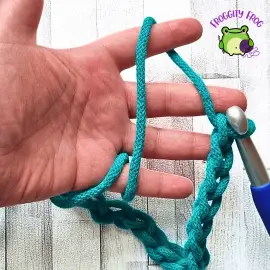
To control the tension of my yarn, I wrap the yarn around my little finger then bring it up over my index finger. My little finger is anchoring my yarn and feeding it through in a controlled way – see the picture above. My index finger is controlling the tension as I can move my finger up or down if I need to loosen up tension or increase it. This movement becomes a subconscious action the more you do it, but it does take practice.
How To Crochet Into A Foundation Chain
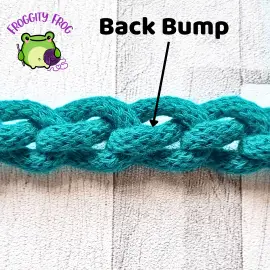
Foundation chains have 3 loops. 2 on the top and one on the back. It is most common to work into the top loop, but you can work into the back bump too. Which you choose is personal preference, as it’s easier to work into the top loop, but the final look is neater if you work into the back bump.
Whichever you choose there will be no effect on the final outcome of your pattern, it’s just how you prefer it to look and which you find more pleasing to do.
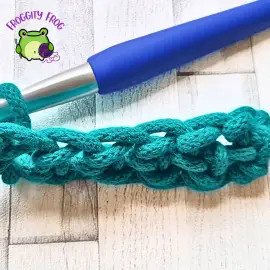
Working into the back bump however gives the bottom of your piece a different look. Working into the back bump forces the front 2 loops to turn down, so they look like the top 2 loops of a stitch. Thus makes working on the other side of the chain much easier, and if you are not adding a border it gives you a much neater finish. See the difference in the pictures below.
Working into the backbump is on the left, working into the top loop is on the right. Working into the back bump gives you a tighter, neater finish.
You can find more free guides on how to crochet here on Froggity Frog. Come on over to our Facebook group – Froggity Frog’s Ribbit And Stitch and show us how you’re getting on and ask any questions you have about your crochet.
Don’t forget to sign up to our newsletter to be the first to know about new stitch guides and new crochet pattern releases. You can sign up here and be the first to see what I’ve got cooking behind the scenes here at Froggity Frog.


0 Comments