

The Paris stitch is a very pretty shell like stitch. It is a one row repeating stitch with an easy to remember repeat. In this stitch guide I will show you how to crochet the Paris stitch with all the pictures that you need along with a video guide that you can follow along with too.
This article contains affiliate links, I may receive a commission for purchases made through these links. As an Amazon Associate, I earn from qualifying purchases.
I first used the Paris stitch as one of the pieces in the Country Garden Crochet Along – a sampler blanket pattern made to look like a country garden scene containing dozens of different crochet stitches. You can access the entire pattern for free here.

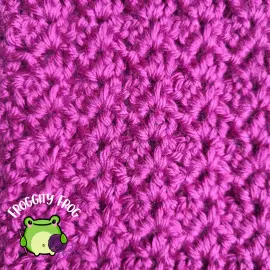
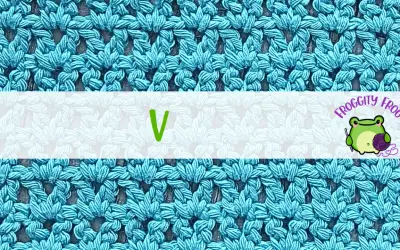
The Paris stitch is a solid, no hole crochet stitch that looks like a high arched shell. The pointy top of each section gives this stitch a unique look and makes it great for using in sweaters and cardigans. It is a flat stitch too so is perfect for any type of garment or anything where you prefer an even fabric.
This how to guide is part of Froggity Frog’s Stitch Vault collection. Have you seen all the other stitches in there? You can take a look here all the guides are free to access and maybe you will discover some new stitches to create for yourself.
For the sample below I used Caron Simply Soft. A good mid range acrylic that comes in a wide range of colours, which is why I chose it for my Country Garden Crochet Along.
I also used a 3.5mm hook – I recommend using Clover Amour hooks. A cost effective hook that is comfortable in your hands thanks to their ergonomic design, so doesn’t make your hands tired when crocheting for long periods of time.
How To Crochet The Paris Stitch
Click here for the left hand video
Abbreviations
- Ch = Chain
- St = Stitch
- Sc = Single crochet
- Dc = Double crochet
Start by making a foundation chain in a multiple of 3 plus 1 (plus 2 for your turning chain)
Row 1. In the 3rd chain from your hook (the turning chain counts as your 1st stitch) make a sc. Make a sc in each stitch across
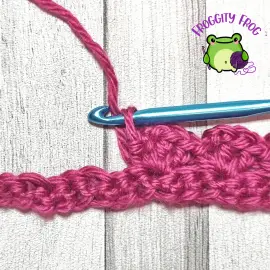
Row 2. Turn, chain 1. Make a dc turning chain in the 1st stitch. Make a dc in the same stitch as your turning chain.
Skip the next 2 stitches. *in the next stitch make (2dc, ch2, sc) all in the same stitch. Skip the next 2 stitches* repeat between *and* then in the last stitch make 2dc
Rows 3 – 18. Turn, chain 1. Make a dc turning chain in the 1st stitch then make a dc in the same stitch.
*skip straight to the next chain space and make (2dc, ch2, sc) all in the same space*
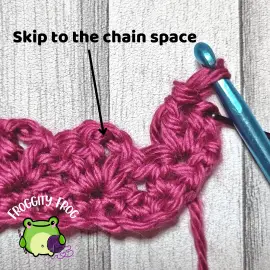
repeat between *and* after the last chain space skip to the last stitch and make 2dc

How To Add A Border To The Paris Stitch
To add a border to the Paris stitch you need to make a single crochet in each stitch across the top and bottom. For the sides make 1 sc into the side of every sc row and 2 sc into the side of every dc row. When you get to the corners add an extra stitch into the corner.
I always recommend that you make a round of single crochet stitches around your piece first before adding any border pattern that you have planned, as doing this just helps to even your stitches out and make a nice solid round to add any further stitches in to.
You can find more free crochet stitch guides here in Froggity Frog’s stitch vault. Come on over to our Facebook group – Froggity Frog’s Ribbit And Stitch and show us what you made with the Paris stitch. I’d love to see what you created with this crochet stitch.
Don’t forget to sign up to our newsletter to be the first to know about new stitch guides and new crochet pattern releases. You can sign up here and be the first to see what I’ve got cooking behind the scenes here at Froggity Frog.


0 Comments