The FrankenScrap Crochet Along is made up of 53 individual pieces that need to be joined together in a particular way in order to fit together properly.
We will be joining the pieces of the FrankenScrap crochet along as we go. You will need 270 metres of yarn for joining and we will be joining each of the pieces with a single crochet join.
This article contains affiliate links, I may receive a commission for purchases made through these links. As an Amazon Associate, I earn from qualifying purchases.
This is done by working on the back side. The ridge of the single crochet should always be on the back, which means that you will only see suture like stitches on the front – just like on Frankenstein’s Monster.
To join, lay your pieces together so the front of each is laid together, so you can see the back of each piece. With your joining colour, join into the first stitch where each of the pieces need to be joined.
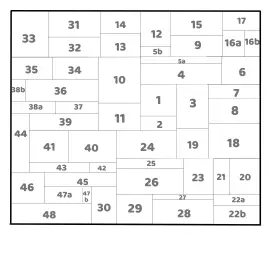
To see how each of your pieces fit together, you will need to refer to the layout and the instructions after the pattern for each individual piece.

Push your hook through both loops of the loops of both pieces, yarn over and pull up a loop. Make a sc. Sc in each stitch across until you have completed your join.
When working down the sides of each of the pieces you will need to use the right number of single crochet in the side of each stitch:
- A single crochet (sc) = 1 st,
- a double crochet (dc) = 2st,
- a treble crochet (tr) = 3st,
- a half double crochet (hdc) = 1st in the 1st row, 2st in the 2nd row. Repeat this sequence up the rows.
FrankenScrap Joining Your Pieces
Click here for the left hand video
For joining the pieces I used Sirdar Cotton DK yarn in orange. I used the same yarn for all my joining, but there is no reason that you can’t use scraps in different colours for your joins.
To join your pieces start by lining up your pieces, so that they are lying front sides together

Your pieces need to be lined up in the right place so that everything fits together in the right way. The picture below shows how all the pieces fit together
The individual instructions for each piece will detail how that piece fits to the previous one
With your joining colour, work through the loops of both pieces and ch1. Sc through the same stitches.

Make a sc in each stitch across, working through the loops of both pieces.
The ridge of stitches will be on the back of the pieces

The front of the pieces will look like sutures – like you see on cartoons of Frankenstein

Once you have joined your pieces, you can cut off and weave in your ends. Then after next weeks piece is released, join that onto your growing blanket in the proper place.
You can find all the links to each weeks pattern on the FrankenScrap page here
Don’t forget to sign up to our newsletter to be the first to know about new stitch guides and new crochet pattern releases. You can sign up here and be the first to see what I’ve got cooking behind the scenes here at Froggity Frog.


0 Comments