

It’s week 37 of the Country Garden crochet along, and our final week.This week we’re making our final round and securing our Butterfly wings while weaving in our ends.
Thank you so much for joining me on this journey to make these beautiful blankets. I have loved seeing your wonderful creations as we’ve gone along, and I hope you have enjoyed it just as much.
If you would like the ad free printable version, it is available either as part of my Lifetime Pattern Pass, or you can purchase it on its own for just £5 from Ravelry
This pattern is written in US terms, but the UK translation are:
- ch (Chain)
- sc (single crochet) = double crochet
If you would like to follow my colour scheme in either Paintbox Cotton Aran or Caron Simply Soft, you can find my colours here
The Pattern
Click here for the left hand video
With Colour H, join into any stitch from the last round and ch 1.
*Slst into the next stitch, then ch1* repeat between *and* all the way round.
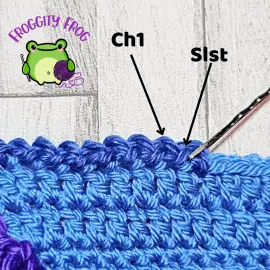
There will be no extra stitches in the corners for this round.
When you get back round to the beginning, slst into the stitch that you joined into, but have your hook go the the side of your join so that the start and end stitches overlap. Cut off.

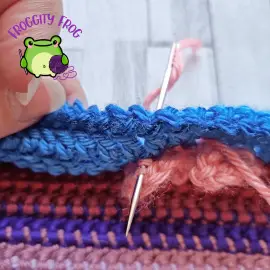
Securing the butterflies
We will be weaving in your butterfly ends and securing the wings at the same time.
We will be using 1 tail to secure both wings on the right side, and the other to secure both wings on the left.
The top wing should be secured in the dc of the last round, 2 stitches across from the post it was made around

You want to gently tack the wing through the back loops, working on the back side of your blanket. Then draw your yarn through to the back side – the video may help you with my process better, but just secure the wings so you don’t see the join on the front.
Now thread your yarn through the back loops of bottom of the stitches around the post so that we can now secure the bottom wing.

The bottom wing should be secured near the join between the border and the panel underneath. Like the top wing, just tack it down by gently working through the back loops.
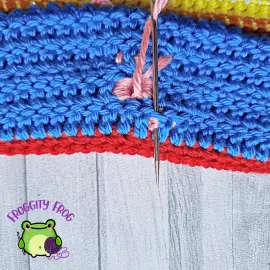
Now you can weave in your end. Repeat this for the other 2 wings, and for every butterfly around.
Once all your ends have been woven in, your blanket is complete!
I’d love to see your finished blanket, please come and share it in the Country Garden Facebook group so we can all admire your fabulous work
Don’t forget to sign up to our newsletter to be the first to know about new stitch guides and new crochet pattern releases. You can sign up here and be the first to see what I’ve got cooking behind the scenes here at Froggity Frog.


0 Comments