

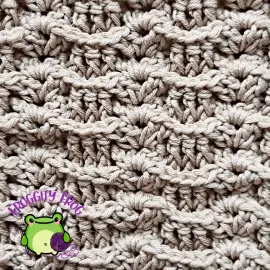
The Little Waves crochet stitch is a highly textured stitch made up of ridges and shells to create a gently rippled look that is eye catching yet elegant. In this stitch guide I will show you how to crochet the Little Waves stitch with all the pictures that you need along with a video guide that you can follow along with too.
This article contains affiliate links, I may receive a commission for purchases made through these links. As an Amazon Associate, I earn from qualifying purchases.
I first used the Little Waves stitch in the FrankenScrap crochet along as one of the pieces of the quilt like blanket. You can access the whole pattern for free here.
The Little Waves stitch is made using shells and post stitches to create it’s highly textured ripple look. I’d call it an intermediate level stitch, but once you get into the rhythm it works up pretty quickly. This stitch would suit a range of projects, but because it’s so textured I personally would use it in combination with a flat and simple stitch and use the Little Waves as a feature stitch within the project.
The pattern for the Littles Waves crochet stitch is a one row repeat, making it fairly simple to make. You will have the textured ridges on both sides of the fabric.
For the sample in the picture below I used Rico Essentials Cotton DK (91) for this piece, a 100% cotton yarn that keeps appearing in my stash. I like this brand of yarn a lot as it’s lovely and silky, has a great colour range to choose from and is a good price compared to other brands of cotton.
This how to guide is part of Froggity Frog’s Stitch Vault collection. Have you seen all the other stitches in there? You can take a look here all the guides are free to access and maybe you will discover some new stitches to create for yourself.
The yarn I used in the pictures of this stitch guide below is Stylecraft Cotton Classique DK, a 100% cotton yarn. It’s a non mercerised cotton that is lovely and soft, but it can get a bit splitty if you frog it a couple of times. It does makes lovely cosy blankets though and is the yarn that got me hooked on cotton as my fibre of choice. I think I first got a ball of this yarn in a mystery bag I got off ebay, and it was a great yarn discovery for me and I’ve been loving using this yarn ever since.
I also used my trusty Clover Amour hooks which are perfect if you are looking for a good value ergonomic crochet hook that won’t cause your hand to ache if you are crocheting for long periods of time. I’ve tried many different crochet hooks over the years, but I always end up coming back to my trusty Clovers. They just sit so well in my hand and never let me down.
How To Crochet The Little Waves Stitch
Click here for the left hand video
Abbreviations
- Ch = Chain
- Sk = Skip
- St = Stitch
- Dc = Double Crochet
- Fpdc = Front Post Double Crochet
You will need a foundation chain in multiple of 8 plus 3 (plus 2 for your turning chain)
Row 1. In the 4th ch from your hook make a dc (your turning chain count as the first st of the row). Make a dc in the next ch. *Sk the next 2 ch, then make (2dc, ch1, 2dc) all in the same ch (see picture below),
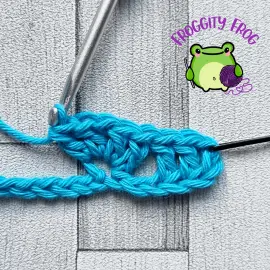
sk the next 2 ch and then make a dc in each of the next 3 ch* repeat between *and*
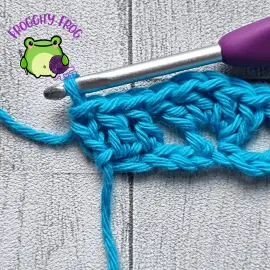
The row will finish at the end of the repeat with a dc in each of the last 3 stitches like in the picture below.
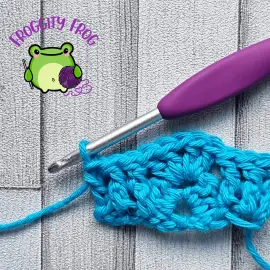
Row 2. Turn and ch1. Make a dc turning ch in the first st and then make a fpdc around the post of each of the next 2 st
*In the ch 1 sp make (2dc, ch1, 2dc) all in the same sp. Make a fpdc around the post of each of the next 3 dc* Repeat between *and*, when you have 3 st left, make a fpdc around the posts of each of the next 2 dc and then make a dc in the last st of the row to finish.
Repeat row 2 until you have as many rows as you need. You will have the ridges on both sides of the fabric.
I used the Little Waves stitch as one of the pieces in the scrappy quilt like FrankenScrap crochet along – find out more about this free pattern here, and join in and access the entire pattern for free.
You can find more free crochet stitch guides here in Froggity Frog’s stitch vault. Come on over to our Facebook group – Froggity Frog’s Ribbit And Stitch and show us what you made with the Little Waves stitch. I’d love to see what you created with this pretty floral crochet stitch.
Don’t forget to sign up to our newsletter to be the first to know about new stitch guides and new crochet pattern releases. You can sign up here and be the first to see what I’ve got cooking behind the scenes here at Froggity Frog.


0 Comments