

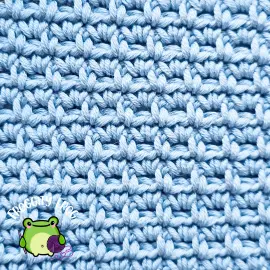
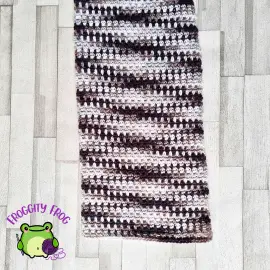
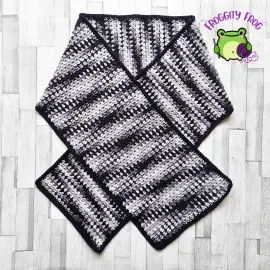
The Sieve Stitch Scarf is a quick and easy free crochet pattern to make and you can make this to any length of your choosing. The Sieve stitch is a simple but pretty stitch that is similar to the Moss stitch. Despite being made entirely of single crochet stitches and chains, this pretty short scarf works up quickly and easily. The free pattern is below with all of the instructions you need to create it for yourself.
If you would like the ad free pdf for this pattern, you can find it inside my Lifetime Pattern Pass here, or you can purchase the single pattern on Ravelry for just £1.27 here
This article contains affiliate links, I may receive a commission for purchases made through these links. As an Amazon Associate, I earn from qualifying purchases.
I first used the Sieve stitch in the FrankenScrap crochet along of 2024 and have been trying to think how I could use this pretty stitch again. Then, when digging through my yarn stash (I’m still trying to stash bust my ridiculously large and varied yarn hoard), I happened upon a couple of very pretty balls of yarn that I hadn’t been able to find a project that suits. Well now I have the perfect combo!
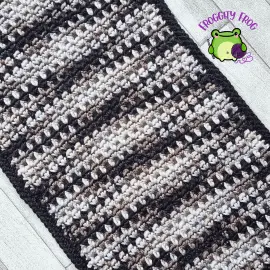
The yarn I picked up was Sirdar Prints Cotton DK, in black, white and grey – a multicolour yarn that is unfortunately discontinued now. However you can use any yarn that calls for a 4mm hook to create this pattern for yourself, or if you would like to make this scarf in a solid colour (like in the picture below) then Sirdar Cotton DK is the exact same yarn as the prints, just in 1 colour.
Although I’ve made this up as a short scarf, you can turn it into a longer scarf that you can tie by using an extra ball of Sirdar Prints and continuing on with the pattern repeat to give you the extra length. A short scarf is designed to just sit around the neck and be tucked inside a jacket or sweater without having a bulky knot in the way. You can also keep a short scarf together by using a brooch or a shawl pin.
I’ve used a 4mm hook to make this scarf. 4mm is the recommended hook size for Sirdar Cotton DK and I found that this keeps the yarn easy to keep on your hook while creating a close solid fabric that isn’t too tight. I got out my trusty Clover Amour hook for this project which is the brand that I’ve found best to sit comfortably in my hand.
What You Need
To make this pattern you will need:
- A 4mm hook
- Sirdar Cotton Prints Shade 358 – 424 m / 464yrds = 2 balls
- Sirdar Black Cotton DK for the border – 42m / 46yrds
- Needle for weaving in ends
My gauge = 23sc in 10cm, 22 rows of sc in 10cm
The Sieve Stitch Scarf Crochet Pattern
Abbreviations
- Ch = Chain
- St = Stitch
- Slst = Slip Stitch
- Sc = Single Crochet
- ChSp = Chain space
- Sk = Skip
Start by making a foundation Ch of 40
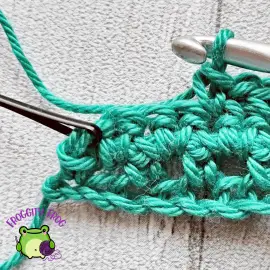
Row 1. In the 2nd ch from your hook make a sc *ch 1 and sk the next st, then make a sc in the next st* repeat between *and* so that the last st of the row is a sc – 39 stitches
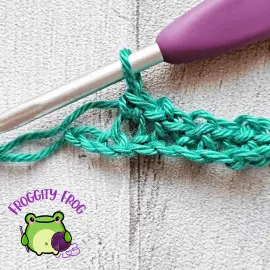
Row 2. Turn and ch1. Sk the first st of the row, *in the next ch sp make 2sc in the same space* repeat between *and*. Make a sc in the last st of the row – 39 stitches
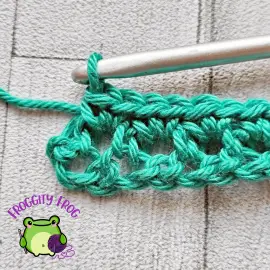
Row 3. Turn and ch1. Make a sc in the first st of the row. *Ch1 and sk the next st. Then make a sc in the next st* repeat between *and* so that the last st of the row is a sc – 39 stitches
Repeat rows 2 and 3 until your scarf reaches your preferred length. I left mine as a short scarf and made 236 rows which gave me a finished length of 114cm x 18cm wide.
If you would like to see a video of how the Sieve stitch is made, you can find the right hand video here and the left hand video here.
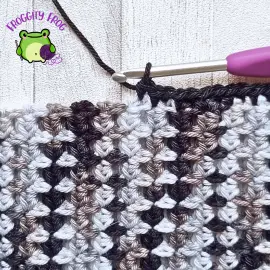
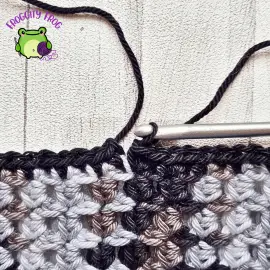
When you get to the end of the first ball of yarn, you want to make sure that you match up the colour changes on your new ball of yarn so that your stripes of colour continue in the same pattern. Once you have the colours lined up you can begin crocheting again, making your first stitch with both strands of yarn to stop the matched up yarns moving apart.
You can see how to do this in the video here
Adding The Border
Round 1. Join into any stitch with a standing sc. Make a sc in every st around.
When you reach the corner make 3 sc in the same stitch,
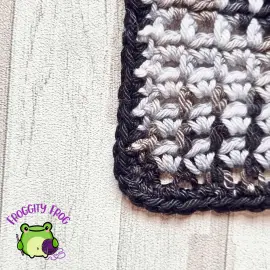
then continue to make 1 sc into every stitch or into the side of every row. You will have the same number of border stitches as you do rows of the main body of the scarf.
When you get back to the standing sc at the beginning of the round make a slst into it.
Round 2. Ch1. Sc into the standing sc. Make a sc into every st around. When you get to the corners, make 3sc into the middle of the 3sc from the previous round.
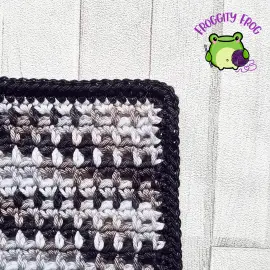
When you get back to the 1st sc of the round, slst into it. You can now cut off and weave in your ends.
Your sieve Stitch scarf is now complete!
I would love to see your finished scarf. Come on over to our Facebook group – Froggity Frog’s Ribbit And Stitch and show off your fabulous creation and discover new crochet friends from around the world.
You can explore the other of the crochet patterns from Froggity Frog here – your next project awaits!
Don’t forget to sign up to our newsletter to be the first to know about new stitch guides and new crochet pattern releases. You can sign up here and be the first to see what I’ve got cooking behind the scenes here at Froggity Frog.


0 Comments