

You can find the links for all the squares in the crochet along here. The free pattern is below, but if you’d like the ad free printable version, it is available either as part of my Lifetime Pattern Pass, or you can purchase it on its own for £5 from Ravelry
This pattern is written in US terms, but the UK translation is below.
UK Translation
Double crochet (dc) = treble crochet
Treble crochet (tr) = double treble crochet
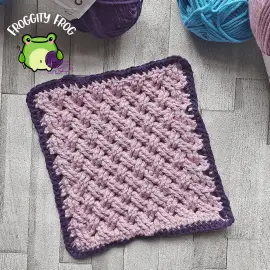
The Pattern
Click here for the left hand video
For this square you will need a 4 mm hook
Start by making a foundation chain of 32
Row 1. In the 4th chain from your hook (turning chain counts as a stitch) make a dc. Dc in each chain across – 30 stitches
Turn
Row 2. Chain 1 and make the alternate turning chain in the first stitch. *Skip 2 stitches and make a front post treble crochet in the next 2 stitches. Go back to the 2 skipped stitches and make a front post treble crochet (fptr) in the first skipped stitch, working in front of the previous stitches, then make another in the second skipped stitch*
Repeat between *and* then dc in the last stitch.

Turn
Row 3. Chain 1 and make the alternate turning chain in the first stitch. Make a back post treble crochet (bptr) around the next two stitches. *skip the next 2 stitches and make a bptr around the next 2 stitches. Go back to the skipped stitches and make bptrs first around the first skipped stitch, then around the 2nd. You need to work behind the first 2 bptr you made so that you start creating the woven effect*
To get to the skipped switches you will need to work in front of the previous stitches. If you’re not sure how to do this I recommend watching the video. You will find this part around 9 minutes in.
Repeat between *and* ending with 2 bptr around the last 2 fptr in the row below, then dc in the last stitch of the row.


Turn
Rows 4 – 15. repeat rows 2 and 3
The Border
Use a 3.5mm hook for the border
Across the top and bottom make 1 sc in each stitch.
For the sides make 2 sc in the side of each row
You should have 30 sc down each side, plus an extra stitch in each corner for the turn. This will make your stitch count as 32 stitches across each side and 124 stitches total (remember the extra stitch corner stitch is counted in the stitch count for both sides)
You have now finished your square and join and you can tie off and weave in the ends
You can now add the interlocking border, joining this weeks square to last weeks as you join. You can see how to do this here
If you have any questions about the pattern or the CAL, then come on over to the Facebook group – 50 Stitches where you can show us your completed squares too.


0 Comments
Trackbacks/Pingbacks