

Over 50 weeks we will be creating 50 separate pieces, each made with a different crochet stitch or technique. There are a variety of difficulties in the stitches we will be using, but each week there will be a photos to help you with the instructions as well as a video (there are left and right handed versions of each) to show how each piece is made.
This article contains affiliate links, I may receive a commission for purchases made through these links. As an Amazon Associate, I earn from qualifying purchases.
You can find all the links for each piece here, and the playlist where you can find all the videos here on YouTube
Week 31 of The 50 Stitches crochet along features the Simple Cable stitch. Cable stitches are easier to make than they first appear, it’s just a case of keeping track of your skipped stitches and knowing which stitches need to appear at the front.You can find the links for all the squares in the crochet along here. The free pattern is below, but if you’d like the ad free printable version you can purchase it for just £5 from Ravelry
This pattern is written in US terms, but the UK translation is below.
UK Translation
- Double crochet (dc) = Treble crochet
- Back post double crochet (bpdc) = back post treble crochet
- Front Post Treble Crochet (fptr) = Front post double treble crochet
For this square I used Rico Cotton Creative Aran which is a 100% cotton non mercerised yarn. I chose this yarn as I love the feel of cotton, and it has a good selection of colours to choose from. This yarn does tend to split a little bit especially if you frog it a couple of times, so if this type of yarn is something you struggle to crochet with, I would choose a different brand.
I used the shade Gentain (87) of Rico Cotton Aran yarn, which is 1 of the 4 different colours I used to create my own 50 stitches blanket. I also used a 4mm hook – I recommend using Clover Amour hooks. A cost effective hook that is comfortable in your hands thanks to their ergonomic design, so doesn’t make your hands tired when crocheting for long periods of time.
The Pattern
Click here for the left hand video
You will need a 4mm hook for this square
Start by making a foundation chain of 32
Row 1. In the 4th chain from your hook make a dc (your turning chain counts as the first stitch of the row). Make a dc in each stitch across – 30 stitches
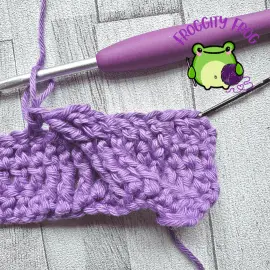
Row 2. Turn and chain 1. Make a dc turning chain in the first stitch then make a dc in each of the next 2 stitches. *Skip the next 3 stitches and make a front post treble crochet around each of the next 3 stitches.

Go back to the 3 skipped stitches (see the picture above) and working in front of the stitches you just made, make a fptr in each of the 3 stitches starting with the one next to the dc at the beginning of the row.
Make 3 fptr in the next 3 stitches* Make a dc in the next 6 stitches. Repeat between *and* one time then make a dc in each of the last 3 stitches – 30 stitches
Row 3. Turn and chain 1. Make a dc turning chain in the first stitch. Make a dc in each of the next 2 stitches. Then in each of the next 9 stitches make a back post double crochet. You may have to reach under some stitches in the pocket between them

In the next 6 stitches make a dc.
In each of the next 9 stitches make a bpdc. Make a dc in the last 3 stitches.
Row 4. Turn and chain 1. Make a dc turning chain in the first stitch then make a dc in each of the next 2 stitches. *Make a front post treble crochet around each of the next 3 stitches. Skip the next 3 stitches and make a fptr around the next 3 stitches. Go back to the 3 skipped stitches and working in front of the stitches you just made, make a fptr around each stitch, starting with the one furthest away from you.*
Dc in the next 6 stitches. Repeat between *and* one time then make a dc in the last 3 stitches.
Row 5. Turn and chain 1. Make a dc turning chain in the first stitch then make a dc in each of the next 2 stitches. In the next 9 stitches make a back post double crochet. You may have to reach under some stitches in the pocket between them. In the next 6 stitches make a dc.
In the next 9 stitches make a bpdc. Make a dc in the last 3 stitches.
Rows 6-13. Repeat rows 2 – 5
The Border
Now you need to add the single crochet border to your week 15 Jacobs Ladder square before we join this one to last weeks square with the Interlocking border. We’re going to be making a round of single crochet around our square. I’ve chosen to do this in a contrasting colour for each of my squares, but you can use a complimenting or same colour as your square if you want. I chose to use Turquoise (36) in Rico Cotton Creative Aran yarn for my border colour, the same colour that I also used for the Interlocking border.
For the top and bottom make a sc on each stitch.
For the sides make 3 sc in the side of rows 1, 4, 10 and 13. Make 2 sc in the side of all other rows.
You should have 30 sc down each side, plus an extra stitch in each corner for the turn. This will make your stitch count as 32 stitches across each side and 124 stitches total (remember the extra stitch corner stitch is counted in the stitch count for both sides)
You have now finished your square and join and you can cut off and weave in the ends

You can now add the interlocking border to join this weeks square to last weeks. You can see how to do this here both as a written guide and with a video to help you too.
If you have any questions about the pattern or the CAL, then come on over to the Facebook group – Froggity Frog’s Ribbit And Stitch where you can show us your completed squares too and join the chat and meet your fellow hookers.


0 Comments