

The Waistcoat crochet stitch can be made in rows and in the round but I have to admit that it looks much neater and even when made in the round as the Vs will line up more neatly than when made in rows. The Waistcoat stitch is most commonly made in the round for a number of reasons.
When working the Waistcoat crochet stitch in rows the pattern looks more staggered due to having to turn your work and having the front and back of the stitches showing on each side. Working in rows you also have to cut off after the end of every row as the Waistcoat stitch only works when you make the rows all on the same side. So you end up with a lot of ends to weave in.
Being a single crochet stitch, the Waistcoat stitch works up rather slowly so is best used with chunky yarn so your project doesn’t become overly tedious. I’ve seen this stitch look wonderful as sweaters, hats and scarves where chunky yarn has been used. The Waistcoat crochet stitch takes quite a bit if time to make, so would be very tedious to use with thinner yarns.
This how to guide is part of Froggity Frog’s Stitch Vault collection. Have you seen all the other stitches in there? You can take a look here all the guides are free to access and maybe you will discover some new stitches to create for yourself.
For this stitch guide I used 2 different types of yarn to create the pictures. The light yellow yarn is Stylecraft Special DK in shade Lemon (1020), and the chunky green yarn is Bobbiny 5mm macarame cord that is great for showing small stitches in great detail. There’s no reason that you can’t use Macarame cord for crochet, it needs at least a 10mm hook but its durable and the stitch definition it gives is incredible. I’ve seen it used fantastically for bag and basket crochet patterns, including some lovely looking clutch purses.
I also used my trusty Clover Amour hooks which are perfect if you are looking for a good value ergonomic crochet hook that won’t cause your hand to ache if you are crocheting for long periods of time. I’ve tried many different crochet hooks over the years, but I always end up coming back to my trusty Clovers.
How To Make The Crochet Waistcoat Stitch
Click here for the left hand video
You can use any number of stitches for the Waistcoat stitch. There is no stitch repeat as the look is made by the way the stitches are formed and are actually just rows of single crochet stitches. It is important that you work with a loose tension though, otherwise you will find that your stitches very hard to work into. If you struggle to keep your tension loose, then go up a hook size even if that hook is bigger than your yarn recommends. This will make your stitches form loosely and make them much easier to work into.
The stitch guide below is written in US terms
- Ch = Chain
- SC = Single crochet
Row 1. Sc in every stitch of your foundation ch, making sure you keep a loose tension throughout.
Row 2. Don’t forget to keep your tension loose for all of your waistcoat stitches.
Turn, chain 1. Make a waistcoat stitch into what will look like the 2nd stitch

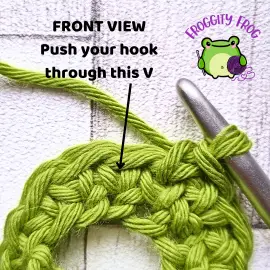
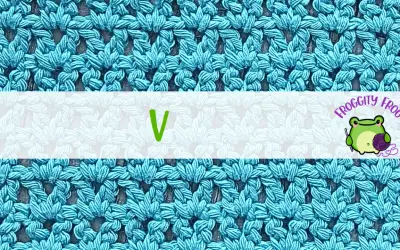
To make a Waistcoat stitch, you will be working into the middle of the single crochet in the row below. Not the loops. You will be working through the middle of the upside down V of the next stitch by making a sc. The picture below shows where you need to insert your hook.
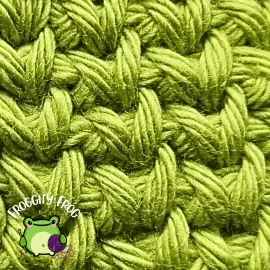
The Waistcoat crochet stitch is just a single crochet that is always made into the middle of the stitch in the row below, always in that upside down V. This is what gives the stitch its distinctive look. If your tension is too tight, it will be very difficult to get your hook through that space which is why it’s so important to keep your tension loose.
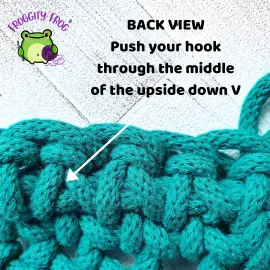
At no point do you ever work through the top loops. Instead your loops will be hidden inside the stitches. This makes the Waistcoat crochet stitch a very dense stitch.
Make a waistcoat stitch in each stitch across the row (or round) – this is all there is to making the Waistcoat stitch. You just need to know which part of the stitch you are pushing your hook through.

The picture above shows the Waistcoat crochet stitch made in rows which is why the stitches are not quite lining up in each row. If it was made in the round, the stitches would match up far more regularly.
You can use the instructions above to work the Waistcoat crochet stitch in either rounds or rows and for any type of project of your choosing. The stitch works up the same no matter what project you choose to make with it.
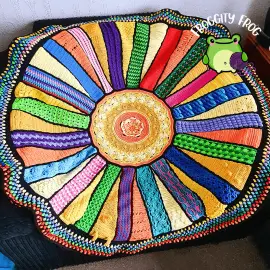
I first used the Waistcoat stitch in my 2nd crochet along, The Ray Of Hope blanket, where it featured in one of the outer rays of the project. It was made in rows for this project, and had a slightly staggered look because of this.
You can find more free crochet stitch guides here in Froggity Frog’s stitch vault. Come on over to our Facebook group – Froggity Frog’s Ribbit And Stitch and show us what you made with the Waistcoat stitch. I’d love to see what you created.
Don’t forget to sign up to our newsletter to be the first to know about new stitch guides and new crochet pattern releases. You can sign up here and be the first to see what I’ve got cooking behind the scenes here at Froggity Frog.


0 Comments