

Welcome to week 10 of the FrankenScrap crochet along, the ugliest and scrappiest crochet pattern that you ever did see!
Over the next 49 weeks, we are going to be making 53 different crochet stitches, each in a different piece of this patchwork blanket. The FrankenScrap was designed as a scrap project, so dive into your yarn stash and clear out those odds and ends that you’ve just not been sure what to do with.
This article contains affiliate links, I may receive a commission for purchases made through these links. As an Amazon Associate, I earn from qualifying purchases.
The FrankenScrap is a completely free crochet along. Each week the next piece of the pattern will be published on my blog, but if you want the concise and add free pdf delivered to you each week that will remain in your Ravelry library, you can purchase that for just £5 here. This is a one off payment that covers the entirety of this CAL.
If you want to prep ahead, you can find out how much yarn you need for each week here as well as the layout and where each piece will fit.
Week 10 Of The FrankenScrap Crochet Along

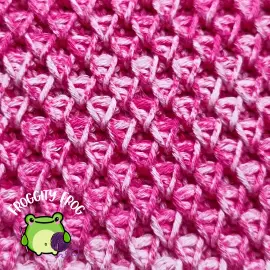
Our next piece of the FrankenScrap crochet along is made with the Honeycomb stitch. For this piece you will need a total of 121 meters of DK / Light Worsted yarn. I used Grundl Nizza 02 for this piece a 100% cotton yarn with a very pretty marled look that also has an almost ombre finish to it as it worked up, getting brighter and fading to create a lovely final look . Unfortunately this yarn has now been discontinued.
The Honeycomb is a challenging stitch and is undoubtably one of the harder stitches within the FrankenScrap. I would say that it is important that you really focus on getting your stitches placed correctly in the first few rows. Once you get the hang of where your hook needs to go in order to bring your spike stitches together, it will work out just fine.
The Honeycomb stitch is a slow stitch to make, but the finished look is simply stunning. I’ve never seen another stitch like it. It would look amazing no matter what type of pattern you chose to use it for, giving plenty of delicate surface texture.
Week 10 FrankenScrap Pattern
Click here for the left hand video
You will need a total of 121 meters of yarn for this piece if you are sticking to my gauge of 16sc in 10cm, 19 rows in 10cm
Abbreviations
- Ch = Chain
- Yo = Yarn over
- St = Stitch
- Sk = Skip
- Sp = Space
- Sc = Single crochet
Start by making a foundation ch of 43 with a 4mm hook or the hook you had to use for your week 2 Single Crochet piece.
I recommend watching the video for this stitch to see where your hook placements need to be.
Row 1. In the 2nd ch from your hook make a sc. Make a sc in each st across – 42 st
Row 2. Turn and ch1. Make a sc in the first st and in each st across – 42 sc
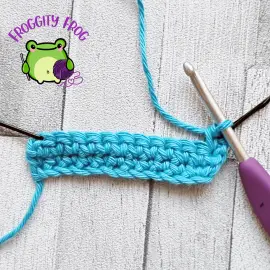
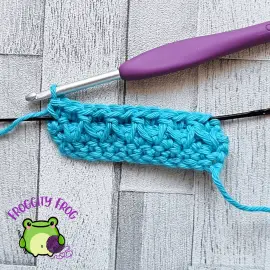
Row 3. Turn and ch1. Make a sc in the first st. *Next make a spike st 2 rows below – insert hook into the next st 2 rows below. Yo and pull up a loop to the height of your last st. Yo and pull through. Make a sc in the next st*
Repeat between *and* the last st of the row is a spike (pictured below) – 42 st
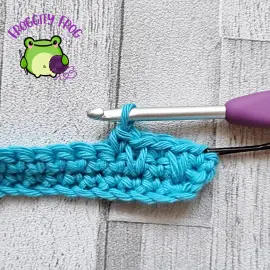
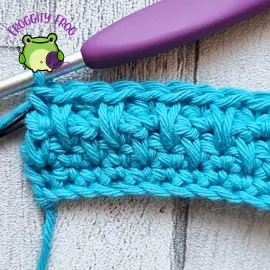
Row 4. Turn and ch1. Make a sc in the first st of the row. *Make a sc, but working in the 2 spike loops. You will be working in the left hand loop of your 1st spike stitch and in the right hand loop of the next spike stitch (if you are left handed it will be the right hand loop of the 1st spike and the left hand loop of the 2nd spike)
The picture below shows how you need to insert your hook into the loops of the 2 spike stitches (watch the video above if you are struggling to envision this)
Make a sc in the next st* repeat between *and* and make a sc in the last st – 42st
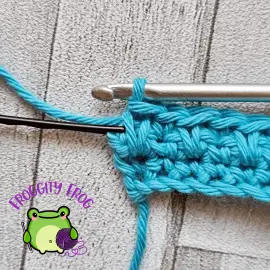
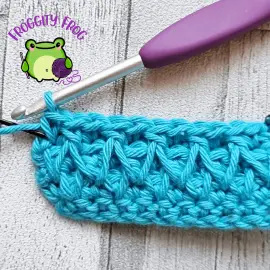
Row 5. Turn and ch1. *Make a spike st 2 rows below making sure you come through the middle of the spike st on the other side (watch the video above if you’re not sure what that looks like). Make a sc in next st* repeat between *and*. Make a sc in the last st of the row.
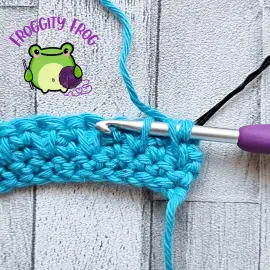
Row 6. Turn and ch1. Make a sc in the first and 2nd st. *Next make a sc working through the 2 loops of spike stitches like you did in row 4. Make a sc in the next st* repeat between *and* Make a sc in the last st of the row
Rows 7 – 56 . Repeat rows 3-6
Joining Your Pieces
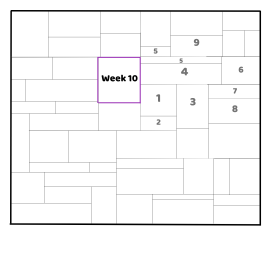
Your finished piece should be 42 stitches wide and 56 rows high, which counts as 56 stitches high for joining purposes since you only have sc rows. You can see how the pieces are joined together here. If you are following my gauge, then your piece will measure 26cm wide and 30cm high. Remember this is just a size indication and if your gauge is consistent throughout, then your pieces will fit together nicely even if your sizes do not match with mine.
The Honeycomb piece should be joined to the top left hand corner of week 5’s Even Berry piece, all the way down the left hand side of week 4’s Lemon stitch and be joined with 22 rows of week 1’s Rug stitch.
The layout below shows how your pieces should be attached in relation to each other.
Click here to see how to join your pieces with the single crochet join. They should line up stitch for stitch using the counts stated above.
Once you have joined this weeks Honeycomb stitch piece to the previous pieces, that is it for week 10 of the FrankenScrap crochet along, I’ll be back next Friday for week 11 and the next piece of your CAL at 8pm UK time.
- Click here for week 9 of the FrankenScrap
- Click here for week 11 of the FrankenScrap
- Click here to access all the links
In the meantime, why not come and join our Facebook group – Froggity Frog’s Ribbit And Stitch and show us your completed Single Crochet pieces. Our super friendly community where you can ask all of your crochet questions, share your latest make and connect with your fellow FrankenScrappers and make new crochet friends. Come join us now right here and join in the conversation.
Don’t forget to sign up to our newsletter to be the first to know about new stitch guides and new crochet pattern releases. You can sign up here and be the first to see what I’ve got cooking behind the scenes here at Froggity Frog.


0 Comments