

It’s week 24 of the Country Garden crochet along. This week we’re making a border around all of our blanket before adding the Moss stitch panel to add a colourful patch to our blanket. The Moss stitch is an easy sticth that always looks stunning no matter what colour combination you use.
If you would like the ad free printable version, it is available either as part of my Lifetime Pattern Pass, or you can purchase it on its own for just £5 from Ravelry
This pattern is written in US terms, but the UK translation are:
- ch (Chain)
- sc (single crochet) = Double crochet
If you would like to follow my colour scheme in either Paintbox Cotton Aran or Caron Simply Soft, you can find my colours here
The Pattern
Click here for the left hand video
Round 1. With Colour A, join into the back loop of any stitch. Make a sc in the back loop of the same stitch. Make a sc into every stitch around using the back loop only, making 2sc in the 2nd corner stitches.
Finish the round by making a slst into the 1st sc
Row 1. With Colour C, join into the 2nd corner stitch above the Spoke square. We will be working into both loops from now on.

Ch 2, then make a sc in the next stitch. *ch1, skip the next stitch, sc in the next stitch* repeat between *and* until you reach the 1st corner stitch at the end of the row. Change colour in last stitch to Colour D – 115 stitches

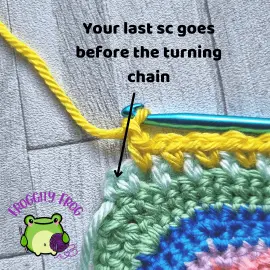
Row 2. Chain 2 then turn. *In the next chain space make a sc, chain 1* Repeat between *and* Make your final sc between the last sc and the turning chain, changing colour in the last 2 loops to Colour L
Row 3. Repeat row 2, in the last stitch change to Colour K
Row 4. Repeat row 2, in the last stitch change to Colour G
Row 5. Repeat row 2, in the last stitch change to Colour P
Row 6. Repeat row 2, in the last stitch change to Colour I
Row 7. Repeat row 2, in the last stitch change to Colour J
Row 8. Repeat row 2, in the last stitch change to Colour M
Row 9. Repeat row 2, don’t change colour
Row 10. Repeat row 2, in the last stitch change to Colour J
Row 11. Repeat row 2, in the last stitch change to Colour I
Row 12. Repeat row 2, in the last stitch change to Colour P
Row 13. Repeat row 2, in the last stitch change to Colour G
Row 14. Repeat row 2, in the last stitch change to Colour K
Row 15. Repeat row 2, in the last stitch change to Colour L
Row 16. Repeat row 2, in the last stitch change to Colour D
Row 17. Repeat row 2, in the last stitch change to Colour C
Row 18. Repeat row 2, don’t change colour

Row 19. Turn, chain 1. Make a sc in the first stitch sc in each stitch, including the chain spaces. Cut off and weave in your ends


0 Comments