


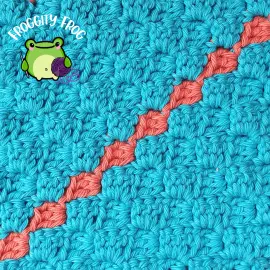
The corner to corner crochet stitch (C2C) is a quick to stitch to make up, and is popular for making large blankets, especially graphgans. It’s proper name is the Diagonal Box Stitch, but it’s so often referred to as C2C that few remember this popular crochet stitch’ real name anymore. In this stitch guide I will show you how to crochet the C2C stitch with all the pictures that you need along with a video guide that you can follow along with too.
This article contains affiliate links, I may receive a commission for purchases made through these links. As an Amazon Associate, I earn from qualifying purchases.
I’ve used the Corner To Corner stitch many times as it is a really quick and easy stitch to make, and you can just crochet mindlessly until you reach the width you need for your project. This stitch is most often used for blankets, particularly graphgans but is also popular for making temperature blankets too.
Each set of stitches creates a block which is square, so perfect for making graphed out designs which are called graphgans. These designs are easy to make for yourself using graph paper, Goggle sheets or crochet design programmes such as Stitch Fiddle. It is easy to change colour after ever C2C block that you make, so it’s super easy to create colourful and complex designs with this stitch.
The C2C is made in diagonal rows, so you start by making a corner, and increase the number of blocks in each row until you have the length and width you need, then you start decreasing again until you finish with the last corner block. It is easy to control the width of your crochet piece, but if you are making a planned graphed design, then you definitely need to make up a gauging swatch before you start to make sure you don’t end up with a monster of a blanket that ends up 10 feet long! (it’s happened, I’ve seen the evidence on Facebook!!)
This how to guide is part of Froggity Frog’s Stitch Vault collection. Have you seen all the other stitches in there? You can take a look here all the guides are free to access and maybe you will discover some new stitches to create for yourself.
The yarn I used in this stitch guide is Stylecraft Cotton Classique DK, a 100% cotton yarn. It’s a non mercerised cotton that is lovely and soft, but it can get a bit splitty if you frog it a couple of times. It does makes lovely cosy blankets though and is the yarn that got me hooked on cotton as my fibre of choice. I think I first got a ball of this yarn in a mystery bag I got off ebay, and it was a great yarn discovery for me.
I also used my trusty Clover Amour hooks which are perfect if you are looking for a good value ergonomic crochet hook that won’t cause your hand to ache if you are crocheting for long periods of time. I’ve tried many different crochet hooks over the years, but I always end up coming back to my trusty Clovers. They just sit so well in my hand and never let me down.
How To Crochet The Corner To Corner Stitch
Click here for the left hand video
The stitch guide below is written in US terms
Abbreviations
- Ch = Chain
- St = Stitch
- Slst = Slip Stitch
- Dc = Double Crochet
This stitch requires that you make a 6 chain foundation. You control how wide your piece gets by deciding when to start your decrease rows.
Row 1. Chain 6. Make a dc in the 4th chain from your hook, then make a dc in each of the next 2 chains.
Row 2. Turn and chain 6. Make a dc in the 4th chain from your hook. Make a dc in each of the next 2 chains. Then slip stitch into the turning chain of the previous row (see picture below). Chain 3 and in the same turning chain make 3 dc.


Row 3. Turn and chain 6. Make a dc in the 4th chain from your hook. Make a dc in each of the next 2 chains. *Slip stitch into the turning chain of the last block in previous row. Chain 3 and in the same turning chain make 3 dc* repeat in the side of all squares from the previous row.
Repeat row 3 until you reach the width you need.
If you want to change colour during your square, just attach your new colour when pulling through the last 2 loops of the last dc of any block, then just carry on as per the pattern.
If you tend to crochet quite tightly like I do, then your turning chains may bow out creating holes. If this happens then make a turning chain of 2 instead of 3 (or 5 instead of 6 for your starting chain). This will tighten everything up and stop the holes from forming.
The Decrease
Once you have reached the width that you need, it’s time to decrease your rows.
Decrease Row. Slip stitch into the top of each of the dc of the last block of the previous row. Slip stitch into the turning chain then carry on the pattern as before (your decrease should look like the picture below before you start making your first bock of the row)

*Chain 3 in the same turning chain make 3 dc* repeat in the side of all squares from the previous row except the last one. To finish the row, slst into the turning chain of the last block. Then turn and begin your next row.
Repeat the decrease row until you only have 1 block left. Then when you have completed the last block you can cut off and weave in your ends.

You can find more free crochet stitch guides here in Froggity Frog’s stitch vault. Come on over to our Facebook group – Froggity Frog’s Ribbit And Stitch and show us what you made with the C2C stitch. I’d love to see what you created.
Don’t forget to sign up to our newsletter to be the first to know about new stitch guides and new crochet pattern releases. You can sign up here and be the first to see what I’ve got cooking behind the scenes here at Froggity Frog.


0 Comments