

Welcome to week 16 of the FrankenScrap crochet along, the ugliest and scrappiest crochet pattern that you ever did see!
Over the next 49 weeks, we are going to be making 53 different crochet stitches, each in a different piece of this patchwork blanket. The FrankenScrap was designed as a scrap project, so dive into your yarn stash and clear out those odds and ends that you’ve just not been sure what to do with.
This article contains affiliate links, I may receive a commission for purchases made through these links. As an Amazon Associate, I earn from qualifying purchases.
The FrankenScrap is a completely free crochet along. Each week the next piece of the pattern will be published on my blog, but if you want the concise and add free pdf delivered to you each week that will remain in your Ravelry library, you can purchase that for just £5 here. This is a one off payment that covers the entirety of this CAL.
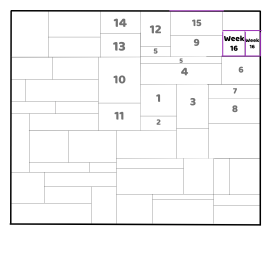
If you want to prep ahead, you can find out how much yarn you need for each week here as well as the layout and where each piece will fit.
Week 16 Of The FrankenScrap Crochet Along
This week we’re making 2 pieces for our FrankenScrap blankets. We will be making the Moss stitch and the Braided Puff stitch. For both of these pieces I used mini skeins of a hand dyed 100% cotton from a little yarn store called the Mermaids Purse here in the UK. I got a set of mini skeins from them many moons ago and they’ve sat in my stash ever since because I couldn’t decide what to use such lovely yarns for.
I also used a 4 mm hook – I recommend using Clover Amour hooks. A cost effective hook that is comfortable in your hands thanks to their ergonomic design, so doesn’t make your hands tired when crocheting for long periods of time. I love my Clover hooks and although I own several different hook brands, I inevitably end up going back and using my trusty Clovers.
The Moss Piece Pattern
Click here for the left hand video
We’re going to start with the Moss piece.
The Moss stitch is a beautiful stitch that looks great both in a single solid colour and in multiple colours too. It is a 1 row repeat and is a great stitch for beginners. You can use this stitch for pretty much anything, and it will always look stunning.
You will need a total of 20 meters of yarn for this piece if you are sticking to my gauge of 16sc in 10cm, 19 rows in 10cm
Abbreviations
- Ch = Chain
- Sk = Skip
- St = Stitch
- Chsp = Chain Space
- Sc = Single crochet
Start by making a foundation chain of 24 with a 4mm hook, or whichever hook you used for week 2’s single crochet piece.
Row 1. In the 4th ch from your hook make a sc *ch1, sk the next st, then make a sc in the next st*. Repeat between *and*
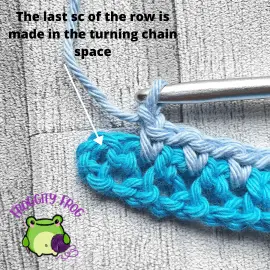
Row 2. Turn and ch3. In the next chsp make a sc
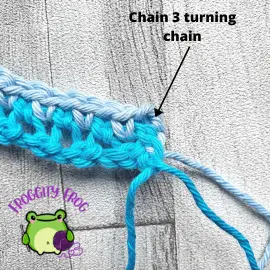
*ch1 and then make a sc in the next chsp* Repeat between *and*. The last st of the row is made in the turning chain from the row below.
Rows 3 – 32. Repeat row 2
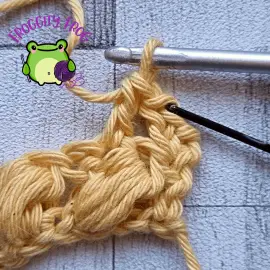
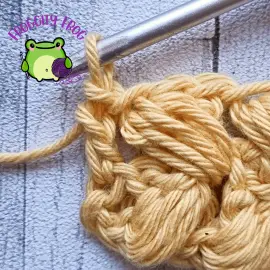
The Braided Puff Pattern
The Braided Puff stitch is a beautiful interlocking pattern that looks like your puffs have all been braided together. The thick puffs maintain their shape by having a double crochet inside, so they will always look thick and puffy even after long use.
You will need a total of 60 meters of yarn for this piece if you are sticking to my gauge of 16sc in 10cm, 19 rows in 10cm
Abbreviations
- Ch = Chain
- Sk = Skip
- St = Stitch
- Chsp = Chain Space
- Dc = Double crochet
Start by making a foundation chain of 17 with a 4mm hook
Row 1. In the the 5th ch from your hook make a dc (your turning ch will count as the first stitch of the row)
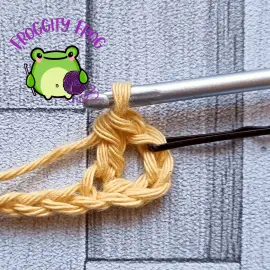
Go back to the 4th ch from your hook *and make a puff by working around the dc so that it ends up inside of your puff. To make your puff – YO and pull up a loop. YO, and working in the same ch, insert your hook and pull up a loop. Repeat this twice more until there are 9 loops on your hook. YO and pull through all of the loops on your hook. Your dc should no longer be visible on either the front or back.
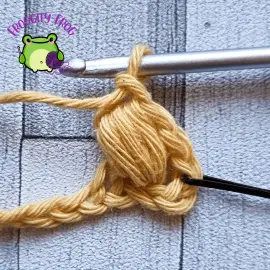
Ch 1. Sk the next ch and then make a dc. Go back to the skipped ch*
repeat between *and* make a dc in the last st of the row – 6 puffs

Row 2. Turn and ch1. Make a dc turning ch in the first st. Make a dc in the top of the puff in the row below.
Go back and make a puff between the 1st puff in the row below and the turning chain *dc in the next chsp, make a puff in the previous chsp working around the dc*
Repeat between *and*. Make a dc in the last st of the row.
Rows 3 – 16. Repeat row 2
Joining Your Pieces
Your finished Moss piece should be 22 stitches wide and 32 rows high. You can see how the pieces are joined together here. If you are following my gauge, then your piece will measure 13.5cm wide and 17cm high. Your Braided Puff piece will be 17 stitches wide and 16 rows high which will count as 32 stitches high since you have dc rows. If you are following my gauge, then your piece will measure 10.5cm wide and 17cm high. Remember this is just a size indication and if your gauge is consistent throughout, then your pieces will fit together nicely even if your sizes do not match with mine.
Both of this weeks pieces should be joined together with the Moss piece on the left and the Braided Puff on the right. Both pieces together fit above week 6’s Cabbage Patch piece. The left edge of the Moss stitch will be joined to week 9’s V Post stitch and the first 4 rows of the Starburst piece.
The layout below shows how your pieces should be attached in relation to each other.
Click here to see how to join your pieces with the single crochet join. They should line up stitch for stitch using the counts stated above.
Once you have joined this weeks pieces to the previous pieces, that is it for week 16 of the FrankenScrap crochet along, I’ll be back next Friday for week 17 and the next piece of your CAL at 8pm UK time.
- Click here for week 15 of the FrankenScrap
- Click here for week 17 of the FrankenScrap
- Click here to access all the links
In the meantime, why not come and join our Facebook group – Froggity Frog’s Ribbit And Stitch and show us your completed Single Crochet pieces. Our super friendly community where you can ask all of your crochet questions, share your latest make and connect with your fellow FrankenScrappers and make new crochet friends. Come join us now right here and join in the conversation.
Don’t forget to sign up to our newsletter to be the first to know about new stitch guides and new crochet pattern releases. You can sign up here and be the first to see what I’ve got cooking behind the scenes here at Froggity Frog.


0 Comments