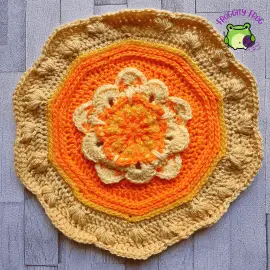
Its week 2 of the Ray Of Hope 2021 crochet along, and we’re continuing with the central mandala. There’s a few more rounds than last week, but I think you’ll enjoy what we start to shape.
During the first few rounds you’re central motif will start to raise up. That’s part of the design, so don’t worry its all part of the plan.
The free pattern is below, but if you’d like the ad free printable version, it is available either as part of my Lifetime Pattern Pass, or you can purchase it on its own for £5 from Ravelry
*Dc in each stitch (9 stitches) – careful to make sure you work into all the back post stitches, they can be easy to miss. Then make 5 dc around the chain 3*
Repeat between *and*
Finish the round by making a slst into the turning chain – 70 dc
The middle of the design will now be puffed up so it looks high in the middle. This is part of the design.
Round 12. In the same stitch that you finished the previous round, make the alternate turning chain (this counts as your 1st hdc)
*Make a dc in the next 2 stitches, then in the next stitch make 3dc.
Make a dc in the next 2 stitches, then hdc in the next 2 stitches.
In the next 5 stitches make a sc, then hdc in the next 2 stitches*
repeat between *and* finish the round by making a hdc then slst into the starting standing hdc – 80 stitches
Round 13. Make the alternate turning chain in the same stitch that you finished the last round (this counts as your first hdc).
In the next 3 stitches make a hdc. *in the next stitch make 2 hdc, then make a hdc in the next 7 stitches*
Repeat between *and* then hdc in the last 3 stitches of the round and finish by making a slst into the turning chain. Cut off – 90 stitches
Round 14. All stitches in this round are to be made in the 3rd loop only.
With Colour A, join with a standing hdc in the 1st hdc where you’ve made 2hdc in the same stitch. Make another hdc in same stitch
*hdc in the next 8 stitches, make 2hdc in the next stitch*
Repeat between *and* then make your last 8hdc and slst into the standing hdc – 100 stitches
Round 15. All stitches in this round to be made in the 3rd loop only.
With Colour B, join with a standing hdc in the 1st hdc where you’ve made 2hdc in the same stitch. Make another hdc in same stitch
*make a hdc in the next 9 stitches, then make 2hdc in the next stitch*
Repeat between *and* then make your last set of 9 hdc and finish the round by making a slst into the standing hdc- 110 stitches
Round 16. All stitches in this round to be made in the 3rd loop only.
With Colour D join with a standing hdc in the 1st hdc where you’ve made 2hdc in the same stitch. Make another hdc in same stitch
*make a hdc in the next 10 stitches, then in the next stitch make 2hdc*
Repeat between *and* then make your last set of 10 hdc and finish the round by making a slst into the standing hdc- 120 stitches
Round 17. Slip stitch into the next stitch, then chain 2 (this doesn’t count as a stitch) in the next stitch
Make a puff (yarn over, insert your hook into the stitch, yarn over and pull up a loop – 3 times, 7 loops on your hook. Then yarn over and pull through all loops on your hook)
ch2, in the same stitch make another puff, ch 2, in same stitch make another puff, ch1.
Skip the next stitch. Dc in the next 9 stitches, skip the next stitch
*in the same stitch (puff, ch2, puff, ch2, puff ch1) skip the next stitch,
dc in next 9 stitches, skip the next stitch*
Repeat between *and* finish the round by making a dc in the same stitch as the chain 2, then slst into the puff stitch – 10 sets of puff stitches
Round 18. To start this round we need to move our yarn to the first dc after the puff stitches. Slst into the chain space, then slst into the top of the puff, slst into the chain space, slst into the next puff, then slst into the dc.
Now we start the actual stitches of round 18 . In the top of the dc after the puff stitches make the alternate turning chain.
Make a dc in the next 2 stitches. *Skip the next stitch, then in the next stitch make (puff, ch2, puff, ch2, puff ch1) all in the same stitch.
Skip the next stitch. Dc in the next 3 stitches.
Fpdc around each of the 3 puff stitches skipping the chain spaces in between the puffs. Dc in next 3 stitches*
repeat between *and* including working over the slip stitches we started the round with. Finish the round by making a slst into the alternate turning chain. – 10 sets of puff stitches
Round 19. Ch1 and make the alternate turning chain in the same stitch. Dc in the next 2 stitches
*make a fpsc around the puff stitch. Chain 1, fpsc around the 2nd puff stitch, chain 1, fpsc around the 3rd puff stitch.
Then make a dc in the next 4 stitches. In the next stitch make 3dc (this is the stitch above the middle puff). Dc in the next 4 stitches*
repeat between *and* dc in the last stitch of the round then finish by making a slst into the turning chain- 160 stitches
That’s week 2 complete. You can know cut off your yarn and weave in your ends before we start part 3 next week. This was the longest week until we get to the border, and next week is the last part of the mandala.
If you have any questions, or just want to join in the chatter, come on over to our super friendly and helpful Facebook group – The Ray Of Hope CAL group
It’s week 46 of the Ray Of Hope crochet along, and can you believe that it's our final week. We’re going to be completing our outer border this week, and that will be your beautiful blanket finished! The free pattern is below, but if you'd like the ad free printable...
This week we are continuing on with our border, and we will be working up to round 12. There are no more decrease rows, from here on in we are repeating just 2 rows, and just changing colours to create our jewelled look. The free pattern is below, but if you'd like...
In week 44 of the Ray Of Hope crochet along we're going to make the first few rounds of our border. By this point you need to have joined all of your pieces together to make a circle. We're using the Moroccan stitch to create a beautiful jewelled look The free pattern...


0 Comments
Trackbacks/Pingbacks