

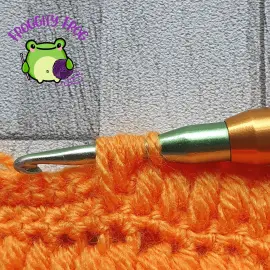
Week 21 of the Ray Of Hope crochet a long features the Cone stitch, also known as the Angel Wings Stitch. This is a very thick stitch that adds beautiful detail to all sorts of projects.
Although there are 7 rows of cones in the picture, I ended up only adding 6 rows of them too the pattern
The free pattern is below, but if you’d like the ad free printable version, it is available either as part of my Lifetime Pattern Pass, or you can purchase it on its own for £5 from Ravelry
This article contains affiliate links, I may receive a commission for purchases made through these links
If you would like to follow my colour scheme, you can find the list of colours in both Scheepjes Softfun and Stylecraft Special DK in this document here
The pattern is written in US terms, but the UK translation is below in brackets along with the abbreviations we will be using
- Single crochet (double crochet) = sc
- Double crochet (treble crochet) = dc
The Pattern
You will need a 3.5mm hook for this piece.
With Colour A make a foundation chain of 22
Row 1. In the 4th chain from your hook make a dc (your turning chain counts as the first dc) dc in each chain across – 20 stitches
Row 2. Turn, chain 1, make the alternate turning chain2tog. Dc in each stitch across until you have 2 stitches left. Make a dc2tog in last stitch – 18 stitches
Rows 3-5. Turn, chain 1. Sc in each stitch across – 18 stitches
Row 6. Turn, chain 1. Sc in the first 3 stitches. In the next stitch make a cone stitch
To make this stitch you will be working into the stitches in the 3 rows below, inserting your hook into the stitches directly below each other.

(Yarn over, insert your hook into the next stitch and pull up a loop, yarn over and in the stitch in the row directly below (row 4) pull up a loop, yarn over, in the stitch in the 3rd row directly below (row 3) insert your hook and pull up a loop.
You should have 7 loops on your hook. Yarn over and pull through all 7 loops on your hook)

Make a cone stitch in the next 11 stitches. Careful when looking for your next stitch as the previous cone van cover it slightly.
Sc in the last 3 stitches – 18 stitches / 12 cone stitches
Rows 7-8. Turn, chain 1 and sc in each stitch across – 18 stitches
Row 9. Turn, chain 1 and sc2tog over the first 2 stitches. Sc in each stitch across until you have 2 stitches left. Sc2tog in these last 2 stitches – 16 stitches.
Row 10. Turn, chain 1. Sc in the first 3 stitches. In the next 10 stitches make a cone stitch. Sc in the last 3 stitches – 16 stitches / 10 cone stitches

Rows 11-13. Turn, chain 1 and sc in each stitch across – 16 stitches
Row 14. Turn, chain 1. Sc in the first 3 stitches. In the next 10 stitches make a cone stitch. Sc in the last 3 stitches – 16 stitches
Row 15-16. Turn, chain 1 and sc in each stitch across – 16 stitches
Row 17. Turn, chain 1 and sc2tog over the first 2 stitches. Sc in each stitch across until you have 2 stitches left. Sc2tog in these last 2 stitches – 14 stitches.
Row 18. Turn, chain 1. Sc in the first 3 stitches. In the next 8 stitches make a cone stitch. Sc in the last 3 stitches – 14 stitches
Rows 19-21. Turn, chain 1 and sc in each stitch across – 14 stitches
Row 22. Turn, chain 1. Sc in the first 3 stitches. In the next 8 stitches make a cone stitch. Sc in the last 3 stitches – 14 stitches
Rows 23-24. Turn, chain 1 and sc in each stitch across – 14 stitches
Row 25. Turn, chain 1 and sc2tog over the first 2 stitches. Sc in each stitch across until you have 2 stitches left. Sc2tog over the last 2 stitches – 12 stitches.
Row 26. Turn, chain 1. Sc in the first 3 stitches. In the next 6 stitches make a cone stitch. Sc in the last 3 stitches – 12 stitches
Rows 27-29. turn, chain 1 and make the alternate turning chain in the first stitch. Dc in each stitch across – 12 stitches
Row 30. Turn, chain 1, make the alternate turning chain2tog over the first 2 stitches. Dc in the next 8 stitches. Make a dc2tog over the last 2 stitches – 10 stitches
Rows 31-33. Turn, chain 1 and make the alternate turning chain in the first stitch. Dc in each stitch across – 10 stitches
Row 34. Turn, chain 1, make the alternate turning chain2tog over the first 2 stitches. Dc in the next 6 stitches. Make a dc2tog over the last 2 stitches – 8 stitches
Rows 35-37. turn, chain 1 and make the alternate turning chain in the first stitch. Dc in each stitch across – 8 stitches
Row 38. Turn, chain 1, make the alternate turning chain2tog over the first 2 stitches. Dc in the next 4 stitches. Make a dc2tog over the last 2 stitches – 6 stitches
Rows 39-41. turn, chain 1 and make the alternate turning chain in the first stitch. Dc in each stitch across – 6 stitches
Row 42. Turn, chain 1, make the alternate turning chain2tog over the first 2 stitches. Dc in the next 2 stitches. Make a dc2tog over the last 2 stitches – 4 stitches
Rows 43-45. turn, chain 1 and make the alternate turning chain in the first stitch. Dc in each stitch across – 4 stitches
Row 46. Turn, chain 1, make the alternate turning chain2tog over the first 2 stitches. Make a dc2tog over the last 2 stitches – 2 stitches
Rows 47-49. turn, chain 1 and make the alternate turning chain in the first stitch. Dc in the last stitch – 2 stitches
Row 50. Turn, chain 1, make the alternate turning chain2tog over both stitches- 1 stitch
Row 51. Turn, chain 1, make the alternate turning chain. Cut off and weave in your ends
The Border
Change to a 4mm hook for the border. Join Colour E (your joining colour) into the side of any stitch. Make 2 slst into the side of every dc row and 1 slst into the side of each sc row.
When you get to the tip of the ray, make 2 slst into 1 side, but when you turn only make 1 slst into the other side of the stitch. Continue to make 2 slst into the side of all other stitches.
You don’t need to add any extra stitches for the corners.
You should have 78 slst down one long side and 77 down the other, and 20 slst across the bottom.
Weave in your ends, and join the piece to week 20

To see how to join the pieces together click here
If you have any questions, or just want to join in the chatter, come on over to our super friendly and helpful Facebook group – The Ray Of Hope CAL group


0 Comments