

Welcome to week 6 of the FrankenScrap crochet along, the ugliest and scrappiest crochet pattern that you ever did see!
Over the next 49 weeks, we are going to be making 53 different crochet stitches, each in a different piece of this patchwork blanket. The FrankenScrap was designed as a scrap project, so dive into your yarn stash and clear out those odds and ends that you’ve just not been sure what to do with.
This article contains affiliate links, I may receive a commission for purchases made through these links. As an Amazon Associate, I earn from qualifying purchases.
The FrankenScrap is a completely free crochet along. Each week the next piece of the pattern will be published on my blog, but if you want the concise and add free pdf delivered to you each week that will remain in your Ravelry library, you can purchase that for just £5 here. This is a one off payment that covers the entirety of this CAL.
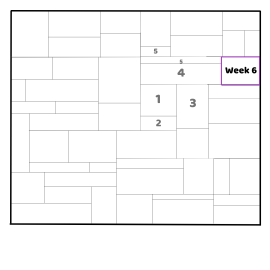
If you want to prep ahead, you can find out how much yarn you need for each week here as well as the layout and where each piece will fit.
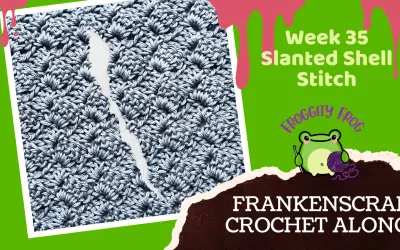
Week 6 Of The FrankenScrap Crochet Along
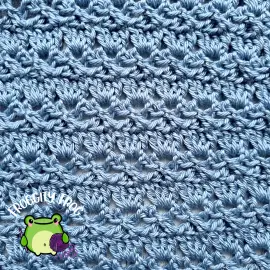
Our next piece of the FrankenScrap crochet along is made with the Cabbage Patch stitch. For this piece you will need 56 meters of DK / Light Worsted yarn. I used King Cole Giza Cotton DK for this piece, a 100% cotton yarn that is unfortunately discontinued in DK weight, and is now only available in 4 ply / fingering weight. It is a lovely silky mercerised yarn that is great for amigurumi and fine wearables – especially ones that you need good stitch definition to make the details pop. It is a hard wearing yarn that is easy to work with and just slides over your hook. It is a lovely yarn and one that I would happily work with again.
The Cabbage Patch stitch is a type of shell stitch that gets it’s unique look by crossing stitches over then working the shells in between. It’s a stitch that is great if you want a delicate lacy look, but have some substance to the fabric as well. When starting the stitch it can look a bit off, but keep going and once you start working into those crossed stitches, it all comes together to make a really pretty look.
This can be one of those stitches that looks much better if you block the piece before joining if it is still looking a bit screwed up after you have completed the piece.
Week 6 FrankenScrap Pattern
Click here for the left hand video
You will need 56 meters of yarn if you are sticking to my gauge of 16sc in 10cm, 19 rows in 10cm
Abbreviations
- Ch = Chain
- Slst = Slip stitch
- Yo = Yarn over
- St = Stitch
- Sk = Skip
- Sp = Space
- Dc = Double crochet
Start by making a foundation chain of 39 with a 4mm hook.
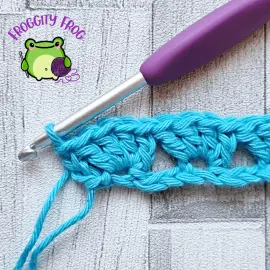
Row 1. In the 5th ch from your hook make 4dc all in the same st (your turning ch counts as your first stitch of the row) *sk the next 3 ch. Now make 4dc in the next ch* repeat between *and* until you have 2 ch left. sk the next ch, dc in the last ch of the row – 38 st
These sets of 4 dc each make a shell. You will need to keep track of the first and last stitch in each shell for the next row.
Row 2. Turn and ch1. Make a dc turning ch in the 1st st. In the last st of the 1st shell (4th dc) make a dc – you will have skipped 3 st.
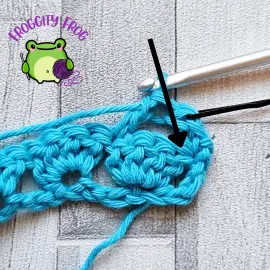
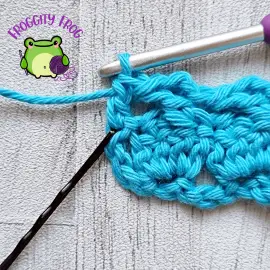
Ch2. Now go back to the 1st dc of the shell (the 1st of the skipped stitches) and make a dc – the stitch shown in the picture above. Your stitches will be crossed, with the second crossing over the front of the first one like in the picture below.

*In the last dc of the next shell make a dc (you will have skipped 3 stitches). Ch 2 and make a dc in the 1st dc of the shell* repeat between *and* make a dc in the last st of the row.
Row 3. Turn and ch1. Make a dc turning ch in the first st. *In the ch2 sp make 4dc* repeat between *and* dc in last st of the row.
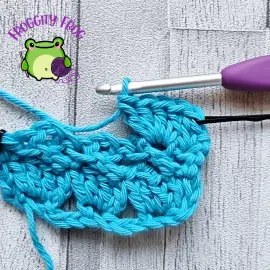
Rows 4 – 17. Repeat rows 2 and 3
Once you have finished row 17 – which should be a repeat of row 3, you can cut off and weave in your ends. Then it is time to join this piece to your previous pieces with the single crochet join.
Joining Your Pieces
Your finished piece should be 38 stitches wide and 17 rows high, which counts as 34 stitches high for joining purposes since each row is a dc row (dc counts as 2 stitches high when counting the number of stitches needed for joining). You can see how the pieces are joined together here. If you are following my gauge, then your piece will measure 24cm wide and 18cm high. Remember this is just a size indication and if your gauge is consistent throughout, then your pieces will fit together nicely even if your sizes do not match with mine.
The Cabbage Patch piece should be joined to the top right hand corner of the Even Berry piece from week 5, and will be attached all the way down to the bottom of the Lemon stitch piece that we made in week 4.
Click here to see how to join your pieces with the single crochet join. They should line up stitch for stitch using the counts stated above.
Once you have joined this weeks piece to the previous pieces, that is it for week 6, I’ll be back next Friday for week 7 of the FrankenScrap crochet along at 8pm UK time.
- Click here for week 5 of the FrankenScrap
- Click here for week 7 of the FrankenScrap
- Click here to access all the links
In the meantime, why not come and join our Facebook group – Froggity Frog’s Ribbit And Stitch and show us your completed Single Crochet pieces. Our super friendly community where you can ask all of your crochet questions, share your latest make and connect with your fellow FrankenScrappers and make new crochet friends. Come join us now right here and join in the conversation.


0 Comments